A private well provides water from underground sources, pumping groundwater into your home for drinking, bathing, and other daily activities. Unlike city water, well owners are responsible for maintaining water quality and system functionality. Understanding how a well system works helps homeowners ensure a safe and reliable water supply.

Types of Wells

Home wells come in three main types. Dug wells are shallow and lined with stone, brick, or concrete, making them more vulnerable to contamination from surface water and pollutants. Driven wells are slightly deeper and provide better protection, but they still face contamination risks. Drilled wells, which extend much deeper underground, offer the best water quality and reliability, as they draw from cleaner groundwater sources that are less affected by surface pollutants.

Components of a Well System
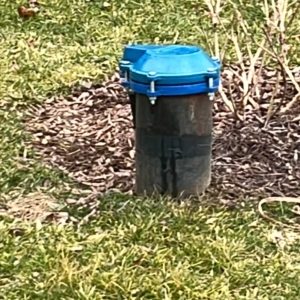
Sanitary Well Cap

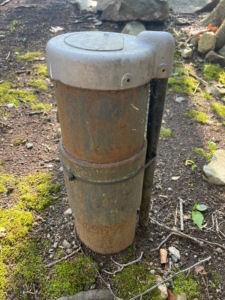
Non-Sanitary Well Cap

A well system includes several key components that ensure safe and efficient water delivery. The well cap is an important part, as it pr0tects the well opening from dirt, insects, and bacteria. A sanitary cap forms a proper seal to prevent contamination, whereas a non-sanitary cap lacks this feature and may allow pollutants to enter the well. Choosing a sanitary cap is essential for maintaining clean water.

  • The height of the well shaft above ground level is another crucial factor in well design. A well casing should extend at least 12 inches above the ground to prevent surface water contamination. Keeping the casing properly sealed and elevated helps protect against pollutants entering the well system.
  • The well pump is responsible for drawing water from the well into your home. There are two primary types: submersible pumps and jet pumps. Submersible pumps are placed deep inside the well and push water upward, making them ideal for drilled wells. Jet pumps are typically used for shallow wells and rely on suction to pull water to the surface.
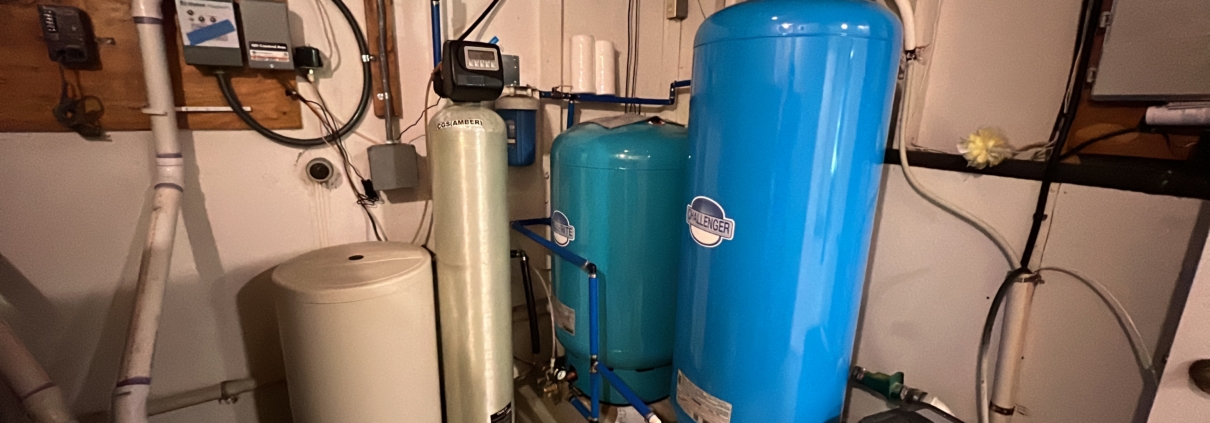
  • The pressure tank plays a crucial role in regulating water pressure and preventing frequent pump cycling. By storing water and maintaining consistent pressure, it ensures a steady flow throughout the home. Without a properly functioning pressure tank, homeowners may experience fluctuating water pressure or increased strain on the well pump, leading to premature wear and tear.
  • Constant pressure pumps help maintain a consistent water pressure throughout the home by adjusting pump speed based on demand. Unlike traditional pumps that operate in cycles, constant pressure pumps use variable speed technology to match water usage, preventing sudden drops in pressure. These pumps are ideal for homes with high water demand, such as those using irrigation systems or multiple appliances simultaneously.
  • A pressure regulating switch is a device that helps control water pressure by turning the pump on and off at preset pressure levels. This switch ensures the well system maintains an optimal pressure range, typically between 40-60 psi. If the pressure drops below the lower limit, the switch activates the pump to restore pressure. Once the upper limit is reached, the pump shuts off, preventing over-pressurization and damage to plumbing fixtures.
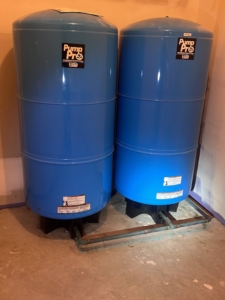
  • Water storage tanks are essential for homeowners who require additional water capacity. These tanks hold a reserve supply, ensuring a steady flow of water even during high-demand periods. Storage tanks help stabilize pressure, reduce pump cycling, and provide backup water in case of pump failure. Flow rates and water pressure are key factors in well performance. The flow rate, measured in gallons per minute (GPM), indicates how much water the well can supply at a given time. A lower-than-expected flow rate may indicate a problem with the pump or the well’s recharge rate. Water pressure should be consistent throughout the home, typically ranging between 40-60 psi for optimal function.

Water Treatment Systems

Since well water is untreated, homeowners often install filtration and softening systems to improve water quality. Filtration systems remove contaminants such as dirt, sand, and debris. Carbon filters help reduce odors, chlorine, and organic pollutants, while reverse osmosis systems provide the highest level of purification, making water safe for drinking and cooking. Additionally, water radon systems help mitigate radon gas, a naturally occurring element that can dissolve into well water from surrounding soil and rock.
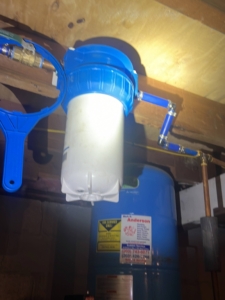
Inline Filter

Filters that are commonly used for improving water quality are inline filters, ultra-violet filters, and whole-house conditioners. Inline filters are installed in the plumbing system to remove sediment and debris before the water reaches appliances and fixtures. Ultra-violet filters use UV light to kill bacteria and other microorganisms, providing an added layer of protection against harmful pathogens. Whole-house conditioners treat water at the main entry point, helping to maintain consistent water quality throughout the home.
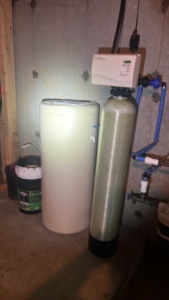
Water Softener

Water softeners address hard water issues by removing excess minerals such as calcium and magnesium. Hard water can lead to scale buildup in pipes and appliances, reducing efficiency and causing damage over time. A softener uses salt to regenerate and flush away accumulated minerals, ensuring softer, cleaner water.

Softener backwashing is an essential process that cleans the softener resin by flushing out trapped minerals. However, it is important to avoid discharging backwash water into a septic system. The high salt content in softener discharge can disrupt the beneficial bacteria within the septic tank, leading to reduced system efficiency and potential failure. Instead, homeowners should direct softener discharge to a separate drain field or another designated location.

Water Testing and Safety

Regular testing ensures that well water remains safe for consumption. Homeowners should test for bacteria, including coliform and E. coli, to detect contamination. Nitrate and nitrite levels should also be monitored, as high concentrations can pose serious health risks, particularly for infants. pH levels indicate whether water is too acidic or alkaline, which can affect plumbing and appliance longevity. Testing for hardness and minerals helps determine whether a water softener is necessary, while radon testing ensures the water is free from harmful gases that could pose long-term health risks.

The Connecticut Department of Public Health recommend testing well water anually, because water conditions can change over time. Regular testing allows homeowners to address potential issues before they become serious health hazards.

Irrigation Systems and Well Water

Homeowners often wonder if they can use their well for an irrigation system. The answer depends on the well’s capacity and flow rate. An irrigation system requires a steady and sufficient supply of water, which may put additional strain on a residential well. Before installing an irrigation system, homeowners should evaluate their well’s production rate to ensure it can handle the extra demand without causing shortages for household use. Installing a separate irrigation pump or using a storage tank can help manage water usage efficiently.

Final Thoughts

Owning a home with a private well requires regular maintenance and a proactive approach to water quality. Proper filtration, water softening, and periodic testing are essential to ensuring clean and safe drinking water. By understanding the key components of a well system and taking the necessary precautions, homeowners can maintain a reliable water supply for their household.

If you need a home inspection or water quality test, contact On Point Home Inspections today!


The Hidden Danger of Buried Oil Tanks

Buried oil tanks were once common for heating homes. Many older properties still have them underground. But they can pose serious risks to homeowners and buyers.

If an oil tank leaks, it can contaminate soil and groundwater. Cleanup is costly, and real estate transactions can be complicated. Knowing how to detect and remove a buried oil tank is essential.

Why Are Buried Oil Tanks a Problem?

Buried oil tanks can cause environmental hazards and financial burdens. When these tanks deteriorate, they can leak, leading to soil and groundwater contamination. Cleaning up this pollution can be expensive, and in some cases, homeowners are legally responsible for the remediation costs. Even if the tank isn’t leaking, its presence can create complications when selling a home. Many mortgage lenders require a tank inspection before approving a loan, and home insurance companies may refuse coverage for properties with buried oil tanks. Buyers are often wary of purchasing a home with a potential environmental liability, which can delay or derail a sale.

Beyond the financial concerns, environmental risks are significant. A leaking oil tank can spread contaminants far beyond the property line, affecting neighboring yards, local water sources, and underground utility lines. Even if a leak is contained, the presence of an abandoned tank can make it difficult to conduct other home improvements, such as landscaping or foundation repairs. Many municipalities have strict regulations regarding oil tank removal, making it necessary for homeowners to act promptly if they discover one on their property.

How to Tell If You Have a Buried Oil Tank

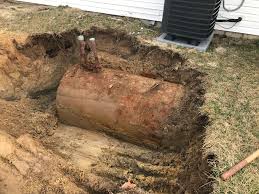
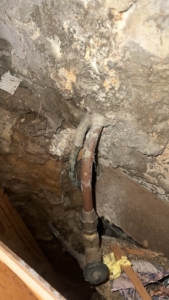
Several signs may indicate the presence of a buried oil tank. Old fill or vent pipes sticking out of the ground, often near the house, are a common indicator. A petroleum odor or stained soil in the yard could signal a leak. If the home previously used oil heat, there may still be an underground tank. Unexplained depressions or sinking areas in the yard might suggest a deteriorating tank underground. Additionally, abandoned oil tank lines passing through a foundation wall can indicate that an underground tank once existed. Homeowners should carefully inspect their property for any of these clues.

A historical review of the property may also provide evidence. Reviewing old blueprints, records of heating system installations, or speaking with previous homeowners can provide more insight. In some cases, local governments or environmental agencies may have records of oil tank installations and removals. A thorough property assessment, including visual inspection and record research, can help confirm the presence of a tank before testing begins.

How to Confirm a Buried Oil Tank

If you suspect an underground oil tank, professional testing can confirm its presence. Specialists use metal detectors and ground-penetrating radar (GPR) to locate tanks. If a tank is suspected, soil testing is the next step to determine if contamination exists. A licensed environmental consultant will take soil samples near the suspected tank and analyze them for petroleum traces. If contamination is found, cleanup may be required before selling the property or proceeding with any home renovations.

Soil testing involves collecting samples from various depths and locations around the suspected tank. These samples are analyzed in a lab to measure levels of petroleum hydrocarbons, which indicate the extent of contamination. If high levels of contamination are detected, more aggressive remediation steps may be required. In some cases, property owners must report contamination to environmental authorities and follow state-mandated cleanup procedures.

How to Remove a Buried Oil Tank

The first step in oil tank removal is hiring a certified environmental contractor. A licensed professional will ensure compliance with local regulations and obtain necessary permits. Before excavation, any remaining oil inside the tank is pumped out to prevent spills. The area is then dug up, and the tank is carefully removed. If contamination is detected, additional soil may need to be excavated and replaced. Post-removal soil testing confirms whether further remediation is required. Once the process is complete, the homeowner receives a closure report, which is essential for future real estate transactions as proof that the tank was safely removed.

Tank removal is not always straight forward. If the tank is located under a driveway, patio, or other structure, additional steps may be needed to safely extract it without causing property damage. In some cases, homeowners may need to excavate large portions of their yard to access the tank, leading to additional landscaping costs. If a leak has spread contaminants into a neighboring property, legal issues may arise, requiring further remediation efforts.

When removing a buried oil tank, it is also important to document each step of the process. Keeping detailed records, including photographs, permits, and soil test results, can protect homeowners from future liabilities. Some states and municipalities offer financial assistance or grants for oil tank removal, helping to offset costs for property owners dealing with unexpected contamination issues.


For a visual guide on oil tank removal, watch this video:    How to Remove a Buried Oil Tank.

The Cost of Oil Tank Removal and Remediation

Oil tank removal costs vary depending on location, tank size, and the extent of contamination. On average, homeowners can expect to pay between $2,000 and $5,000 for removal. If soil contamination is detected, cleanup costs can range from $5,000 to $20,000 or more, depending on severity. In extreme cases, contamination can spread to groundwater, requiring extensive remediation efforts that cost tens of thousands of dollars.

Insurance coverage for oil tank removal and remediation depends on the policy. Some homeowners’ insurance policies may cover costs related to contamination, while others exclude oil tanks from coverage. It is essential to check with your insurance provider and consider additional coverage if necessary.

Preventative Measures and Best Practices

If you discover an unused buried oil tank on your property, acting proactively can prevent future problems. Regularly inspecting the area for signs of leaks, maintaining detailed property records, and performing soil tests if concerns arise can help avoid costly remediation. If you are purchasing a home with a history of oil heating, request documentation on past tank removals or inspections before finalizing the sale.

In some cases, homeowners opt to decommission an oil tank rather than remove it. Decommissioning involves cleaning the tank, filling it with an inert material (such as sand or foam), and sealing it to prevent leaks. While this method is sometimes allowed, it may not be acceptable in all jurisdictions. Some buyers and lenders still prefer complete removal to eliminate future risks.

Protect Your Investment

Buried oil tanks pose financial and environmental risks. If you suspect one on your property, act fast. A professional inspection and safe removal can prevent costly problems.

If you are buying a new home or selling your current home, call On Point Home Inspections  for a thorough inspection.

Want to learn More about Underground Storage Tanks? Visit https://www.epa.gov/ust/learn-about-underground-storage-tanks#what

Septic systems are essential for homes not connected to municipal sewer lines. They treat and dispose of wastewater safely. Understanding how they work helps homeowners maintain their systems and avoid costly repairs. For additional guidance on maintaining your septic system, visit the EPA Septic System Information page.

What Is a Septic System?

A septic system is an underground wastewater treatment structure that processes sewage from toilets, sinks, and other household drains. Proper maintenance keeps it functioning efficiently for decades. For more details on what a septic system is, visit ACTAT.

How a Septic System Works

Wastewater from household drains enters the septic tank, where solids settle, and grease rises. Anaerobic bacteria break down organic matter, reducing the volume of solids. The liquid, or effluent, then moves to the drain field, where it undergoes further filtration. The surrounding soil absorbs and treats the liquid, allowing clean water to return safely to the environment. More details on septic system maintenance can be found in Septic System Maintenance Tips.

Key Components of a Septic System

A standard septic system has several important components:

Septic Tank

The septic tank is a large, watertight container made of concrete, fiberglass, or plastic. It holds wastewater long enough for solids to settle and form sludge, while lighter materials like grease and oils float to the top, creating scum. The remaining liquid flows into the drain field.

Inlet and Outlet Pipes

Inlet and outlet pipes move wastewater in and out of the septic tank. The inlet pipe carries wastewater from the home, while the outlet pipe allows treated liquid to exit the tank and move to the drain field.

Drain Field

The drain field, also known as the leach field, consists of a network of perforated pipes buried in gravel or sand. The liquid from the septic tank spreads out and percolates into the soil, where it is filtered and treated before returning to the groundwater.

Soil and Bacteria

Soil and naturally occurring bacteria play a crucial role in breaking down harmful pathogens, removing contaminants before the water re-enters the environment.

Distribution Boxes and Cleanouts

A distribution box (D-box) evenly distributes effluent from the septic tank to the various drain field lines. It ensures wastewater is spread uniformly, preventing overloading in one section of the drain field. If a D-box becomes clogged or misaligned, it can lead to uneven drainage and system failure.

Cleanouts are access points in the septic system that allow homeowners and professionals to inspect and clear blockages in the pipes. They are typically located along the main line leading to the septic tank or in key sections of the drain field. Regular use of cleanouts helps prevent backups and keeps the system functioning efficiently.

Sizing a Septic System for Your Home

A common misconception is that a septic tank size is based on how many bathrooms are in a home.  The septic system size is actually determined by the number of bedrooms in a home. The larger the home, the larger the septic tank and drain field required.

  • 3 bedrooms: Minimum 1,000-gallon tank
  • 4 bedrooms: Minimum 1,250-gallon tank
  • 5 bedrooms: Minimum 1,500-gallon tank

The drain field size also varies based on soil type, percolation rate, and daily wastewater flow. A professional evaluation ensures the system meets household needs.

Types of Leaching Fields

Different types of leaching fields are used depending on soil conditions, space availability, and environmental factors:

Conventional Gravel/Stone Drain Field

This is the most common type. It uses perforated pipes placed in a bed of gravel or crushed stone. The wastewater is filtered as it percolates through the gravel and soil.

Chamber System

A chamber system replaces gravel with plastic chambers. This design allows for better wastewater distribution and is ideal for areas with high water tables or poor soil drainage.

Drip Distribution System

This system uses small drip tubing to evenly distribute wastewater across a larger area. It is often used on properties with limited space or shallow soil conditions.

Mound System

For areas with high groundwater or shallow soil, a mound system is used. It consists of a raised mound of sand and gravel where wastewater is treated before entering the natural soil.

Sand Filter System

A sand filter system uses a bed of sand to treat wastewater before it reaches the soil. It provides additional filtration and is ideal for locations with poor natural filtration capabilities.

Pump-Up Systems and Pump Chambers

In some septic systems, a pump-up system is required when the drain field is located at a higher elevation than the septic tank. These systems use a pump chamber to collect effluent before pumping it to the drain field. The pump chamber contains a submersible pump, control floats to regulate water levels, and an alarm system to signal malfunctions. Pump-up systems ensure proper wastewater distribution when gravity drainage is not possible.

Septic Alarm Systems and Battery Backups

Septic alarm systems monitor water levels in the pump chamber and alert homeowners to potential issues before they become major problems. These alarms sound or flash when the water level is too high or when the pump is not functioning correctly. Installing a battery backup for the pump-up system is essential in case of power outages. Battery backups keep the pump running, preventing overflows and system failures during emergencies.

Sewer Scope Camera Benefits

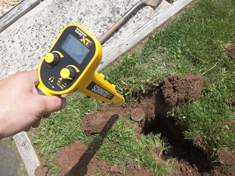
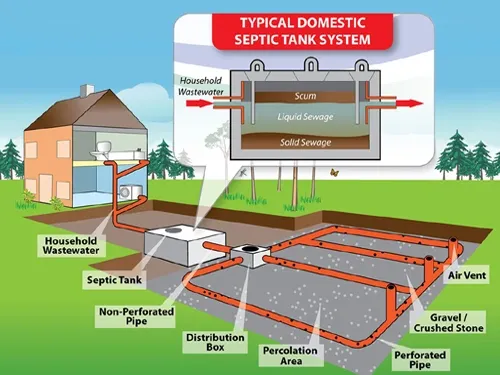
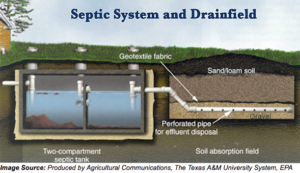
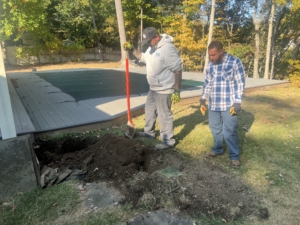
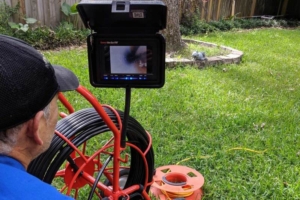
Using a sewer scope camera during a septic inspection provides valuable insights into the condition of your system. A small, waterproof camera is inserted into the pipes to check for blockages, leaks, root intrusions, or signs of damage. This technology helps identify problems early, preventing costly repairs and system failures. It also provides visual confirmation of pipe integrity, ensuring that the septic system is functioning efficiently.

Maintenance and Best Practices

To keep a septic system working properly, homeowners should schedule regular pumping every three to five years, depending on household size and tank capacity. Avoid overloading the system by fixing leaks and spreading out laundry loads to prevent excess water from entering the tank. Be mindful of what goes down the drain—only flush human waste and toilet paper, and avoid grease, coffee grounds, and non-biodegradable items.

Protect the drain field by keeping vehicles and heavy structures off the area and ensuring proper drainage to prevent flooding. Use septic-safe cleaning products and minimize harsh chemicals that could kill beneficial bacteria.

Signs of Septic System Problems

Common warning signs of septic failure include slow draining sinks and toilets, gurgling sounds in plumbing, sewage odors in the yard, wet or unusually green grass over the drain field. If any of these issues arise, immediate action is needed to prevent further damage.

Remember

A septic system is a vital part of many homes. Regular maintenance ensures efficiency and prevents costly repairs. Have On Point Home Inspections schedule a septic inspection for you today!

Is It Time to Switch Your Heating System to a Heat Pump?

If your current heating system is outdated, inefficient, or frequently needing repairs, it may be time to switch your heating system to a heat pump. Heat pumps offer both heating and cooling in a single unit, making them an energy-efficient solution for year-round comfort. If you’re considering upgrading your HVAC system, a heat pump could be the best choice. Let’s explore the benefits, the installation process, and factors to consider before making the switch.

Learn more about our home inspection services to help you assess the best HVAC solutions for your home.


Can You Replace Your Old Heating System with a Heat Pump?

Replacing your old heating system with a heat pump is not only possible but often the most efficient upgrade you can make. Many homeowners are moving from traditional furnaces and boilers to energy-efficient heat pump systems for better performance and year-round functionality.

If your home currently uses a forced-air system, upgrading to an air-source heat pump is typically a straightforward process. The heat pump can often be connected to the existing ductwork, allowing for a smooth transition.

However, if your current system is a boiler or radiant heating, you might need a ground-source (geothermal) heat pump system. This option can be more costly to install but is a great choice for colder climates or those who seek the ultimate in energy efficiency.

Explore our FAQ page to learn more about HVAC options for your home.


What’s Involved in Installing a Heat Pump HVAC System?

The process of installing a heat pump system is simple but requires professional assistance to ensure the system is set up for optimal performance. Here’s what’s involved:

  1. Home Assessment: A professional technician will evaluate your home’s size, insulation quality, and the type of existing system to 
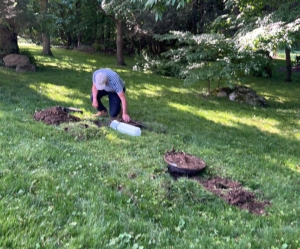
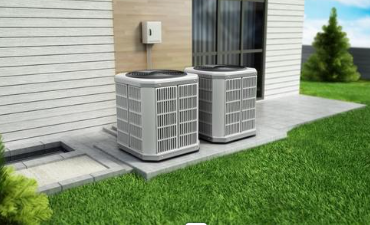
recommend the best heat pump.
  2. Choosing the Right Heat Pump System: Based on your needs, the technician will help you decide whether an air-source or ground-source system is best for your home.
  3. Ductwork Compatibility: In many cases, your existing ducts can be used, though older or improperly sized ducts may require adjustments.
  4. Installation: The outdoor unit (for air-source systems) or underground piping (for geothermal systems) will be installed, and the indoor unit will be connected to your home’s ductwork.
  5. Testing and Calibration: After installation, the system will be calibrated and tested to ensure it’s functioning properly.

Check out our full home inspection checklist to understand what we check during inspections, including HVAC systems.


Benefits of Replacing Your Heating System with a Heat Pump

There are several reasons why homeowners are choosing to replace their heating systems with a heat pump. Below are the key benefits:

1. Energy Efficiency

Heat pumps are incredibly energy-efficient because they transfer heat rather than generate it. This results in lower energy consumption and reduced utility bills compared to traditional heating methods like gas furnaces or electric baseboard heaters.

2. Dual Functionality

Heat pumps provide both heating and cooling, which eliminates the need for separate systems. This dual functionality saves space and money, as one system can handle your home’s heating needs in winter and cooling needs in summer.

3. Environmentally Friendly

By using renewable energy sources (such as air or ground heat), heat pumps are more environmentally friendly than systems that rely on fossil fuels. This helps reduce your home’s carbon footprint.

4. Improved Comfort

Heat pumps distribute heat evenly throughout your home, eliminating hot or cold spots that can occur with traditional heating methods. The result is consistent comfort in every room.

5. Long-Term Savings

Although heat pump systems may have a higher initial cost, their long-term energy savings make them a wise investment. Over time, lower utility bills and reduced maintenance costs will help offset the upfront cost.


Considerations Before Switching to a Heat Pump

Before upgrading to a heat pump, there are a few considerations to keep in mind:

1. Initial Investment

The installation cost of a heat pump can be higher than traditional systems. However, the energy savings over time make this a worthwhile investment.

2. Climate Suitability

Heat pumps work best in moderate climates. If you live in an area with extremely cold temperatures, you may need a backup heating system. Ground-source heat pumps are more efficient in colder climates, but they are more expensive to install.

3. Home Size and Insulation

The size of your home and its insulation will impact the performance of a heat pump. Homes with poor insulation or larger homes may require a more powerful system or upgrades to ensure the heat pump operates efficiently.

Contact us for a consultation to evaluate your home’s suitability for a heat pump upgrade.


Conclusion: Is a Heat Pump the Right Choice for Your Home?

Switching to a heat pump system offers several benefits, including energy savings, increased comfort, and eco-friendliness. If you’re replacing an old or inefficient heating system or seeking an all-in-one heating and cooling solution, a heat pump could be the right choice for your home.

Consult with a professional HVAC technician to determine the best heat pump system for your home’s needs. If you’re considering buying a new home or selling your current one, schedule your inspection with On Point Home Inspections!

We not only inspect your home, we provide peace of mind.


AI-Assisted Content Notice: This blog post for On Point Home Inspections was created with AI assistance. While we strive for accuracy, the content is for informational purposes only and should not replace professional home inspection services. We recommend consulting a qualified inspector for specific property advice. On Point Home Inspections does not guarantee the accuracy or reliability of this AI-assisted content.